Reaching Near-Space from the Schoolyard: A Practical Guide for Classrooms & Hobbyists
A hands-on guide to high-altitude ballooning for educators, students, and hobbyists. Learn the equipment, physics, airspace rules, and mission planning needed to send a payload to near-space.
Key Takeaways
- Latex weather balloons ascend slowly and predictably — ideal for student missions
- One cubic meter of helium provides roughly 1 kg of lift at sea level
- Keep payload under 4 lbs and outside controlled airspace for smooth FAA compliance
- Redundant GPS trackers and insulated lithium batteries are essential for cold-altitude survival
- The mission is tangible — students retrieve their own data, photos, and hardware
Reaching Near-Space from the Schoolyard
There is something unforgettable about watching a balloon disappear into the sky — especially when you know it’s headed toward the edge of space.
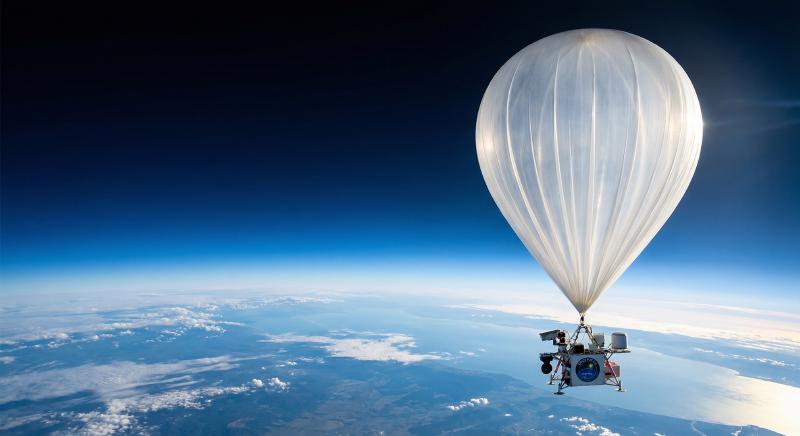
High-altitude ballooning (HAB) allows students, educators, and hobbyists to send cameras and experiments 60,000–100,000 feet above Earth. At those altitudes, the sky darkens, the curvature of Earth becomes visible, and temperatures plunge far below freezing. Yet the barrier to entry is surprisingly accessible.
For schools and independent builders, this isn’t just a science project — it’s a complete STEM experience.
Why High-Altitude Balloons Are Ideal for Education
Unlike rockets, high-altitude balloons move slowly and predictably. A latex weather balloon filled with helium ascends at roughly 4–5 meters per second. Over 1–2 hours, it climbs into the stratosphere before bursting, and a parachute gently returns the payload to Earth.
This simple architecture lets students explore:
- Atmospheric science – Temperature, pressure, and humidity changes with altitude
- Physics – Buoyancy, lift, drag, and free-fall in real conditions
- GPS tracking and telemetry – Live position data from stratospheric altitude
- Electronics packaging – Engineering systems to survive extreme cold and low pressure
- Data collection and interpretation – Comparing predictions to actual flight data
- Aerial photography – Imagery students will remember for life
The experience spans physics, engineering, programming, meteorology, and geography — all in a single mission.
What Goes Into a High-Altitude Balloon Mission?
A typical school mission includes:
| Component | Purpose |
|---|---|
| 300–600g latex weather balloon | Provides lift through the atmosphere |
| Helium | Lifting gas — safe, non-flammable |
| Lightweight insulated payload box | Protects electronics from −60°C cold |
| GPS tracker (satellite + cellular backup) | Transmits position for recovery |
| Camera | Captures images from near-space |
| Parachute | Slows descent after balloon burst |
| Lithium batteries | Perform reliably at low temperatures |
Systems like SkyReachSupply’s SKRHAB 1 are built around this modular architecture, making it easy for classrooms to focus on the science rather than troubleshooting hardware.
The Most Important Lesson: Lift & Balance
Students quickly learn that ballooning is not guesswork — it’s physics.
At sea level:
- Each cubic meter of helium provides roughly 1 kg of lift
- You must account for: balloon mass + payload mass + desired ascent rate
Too little helium → balloon climbs too slowly or fails to reach altitude Too much helium → balloon bursts prematurely before reaching near-space
The water-jug anchor test is a common classroom method: attach the inflated balloon to a container of water matching the desired free lift amount. If the balloon lifts the jug, it has enough free lift. It’s a direct, hands-on demonstration of Archimedes’ principle in action.
Ascent Rate Targets
| Free Lift | Ascent Rate | Result |
|---|---|---|
| Too low (<200g) | <2 m/s | Slow climb, may not reach target altitude |
| Ideal (300–500g) | ~4–5 m/s | Reaches 90,000–100,000 ft |
| Too high (>700g) | >7 m/s | Burst at lower altitude |
Capturing Images from Near-Space
Modern action cameras make aerial photography straightforward:
- Set continuous photo mode – Every 5 seconds gives thousands of images over a 2-hour flight
- Or capture full video – Some missions record the entire ascent and descent
- Insulate batteries with hand warmers – Cold significantly shortens battery life at altitude
- Mount the camera securely – Vibration and spinning at burst can shake loose weak mounts
The results? Shots of Earth’s curvature and the thin blue atmosphere that students will carry with them long after the mission.
Safety & Airspace Awareness
In the United States, payloads under 4 lbs are generally permitted outside controlled airport areas under FAA Part 101. Even so, responsible teams:
- Avoid Class B, C, and D airspace – The rings around major airports on sectional charts
- Stay 5+ nautical miles from airports without advance coordination
- File a NOTAM (Notice to Air Missions) as a courtesy to notify pilots
This introduces students to real-world aerospace responsibility. Filing a NOTAM isn’t just paperwork — it’s the same notification process used by professional aerospace operators.
See our FAA Part 101 guide for a detailed breakdown of the rules.
Planning the Recovery
A balloon that goes up must come down. Recovery planning is where many first missions go wrong.
Essential recovery steps:
- Use a flight predictor – HabHub Predictor and CUSF Landing Predictor model winds at altitude to estimate landing zones
- Run predictions the morning of launch – Wind patterns shift overnight
- Have a chase vehicle and crew – Don’t launch without a recovery team in position
- Use redundant trackers – One GPS tracker is a single point of failure; two is a recovery plan
Typical flight profile:
- Ascent: ~90–120 minutes to 90,000–100,000 ft
- Burst: Balloon pops, parachute deploys
- Descent: 20–40 minutes back to Earth
- Landing zone: Typically 10–60 miles downrange depending on winds
Post-Mission: Where the Real Learning Happens
After recovery, the mission becomes a data analysis project:
- Download and review photos – At what altitude did the sky go dark? Where is the curve of Earth visible?
- Export GPS track data – Graph altitude vs. time; calculate ascent/descent rates
- Compare predictions to actuals – Were the flight predictor tools accurate? Why did the landing zone differ?
- Inspect the hardware – What survived? What failed? What would you change?
The tangibility of the mission is its biggest educational strength. Students see their data, retrieve their hardware, and analyze images from near-space. It’s not a simulation.
A Final Thought for Educators
High-altitude ballooning bridges curiosity and capability. Whether you assemble your own components or use a pre-structured system like the SKRHAB 1, the experience teaches problem-solving, teamwork, and applied science in a way that a classroom exercise cannot replicate.
It may begin with a balloon. But for many students, it becomes a launch point.
Ready to plan your mission? Browse our HAB kits or reach out to us with questions — we’re here to help you fly.